Wednesday, February 28, 2007

Blooming with Happiness


I got this adorable hostess set yesterday and was so excited to play with it. I started by stamping the blossom dress on shimmery white paper with black Stazon. Then I went to my box of markers and pulled out some of the soft subtles. I colored the dress and loved it immediately. Then I pulled out the Almost Amethyst card stock. I'm having a little love affair with that color lately. On the amethyst base I first stamped the Canvas background in Almost Amethyst. Then I stamped the French Script in white craft ink over that. I also used the white ink pad to color the edges of the card and each layer before I put the whole thing together. Anyway, I tried several colors for matting the dress and sentiment and ended up liking the celery the best. Those layers are on dimensionals and attached to Pretty in Pink. But first I wanted to add an elegant looking ribbon. So, to me, that means organdy. I pulled out my wide white organdy and tied a big bow between the dress and words. I love the way that the ribbon just finished it off. I hope you like!

Have a fabulous day. Tonight is LOST!! yeah! And can you believe that today is the last day of February? Wow! Time is just flying by these days. My dad always said that the older you get, the faster time goes by. That is an easy one to see! So enjoy the moments you have today. Hug your kids, kiss your sweetheart, and have dessert first. heehee.

Tuesday, February 27, 2007

Elegant Unfroggetable


Here is another offering from Unfroggetable. As I was trying to decide what to use next, my Label Classics jumped up and begged to be used. I liked the flower inside the rectangle the best. I stamped the rectangle with Elegant Eggplant and the flower in Basic Black. I used markers to color in the flower with Elegant Eggplant, Almost Amethyst, and Always Artichoke. I then cut out the rectangle close to the scallops. For the card base I used Almost Amethyst stamped in the same color with the Flannel Plaid Background. I stamped a piece of Elegant Eggplant in the same color using the Paisley Background. Once I mounted the eggplant piece to the left edge of the card base I used my craft knife to cut a slit alongside it. I put my eggplant grosgrain ribbon through the slit. Then I put the corner rounded, Always Artichoke layer onto the card, tied the ribbon and attached the focal image. No dimensionals today, believe it or not. Lastly, I stamped Happy birthday using the Everyday Flexible Phrases set in eggplant. I used my Word Window Punch and a 1/16" hole punch. Linen thread ties the piece into the ribbon. Voila! There you have it! An elegant card from the Unfroggetable set. I love how versatile one set of stamps can be by changing colors and embellishments.

I'm off for a busy day. Post office, grocery store, cooking for a cub scout dinner tonight. It's my little one's first Blue and Gold Dinner. He is so excited! Oh yeah, I also have to run one of the girls to the orthodontist today. Busy, busy, but hey, aren't we all?

Did you see Heroes last night? Finally lots of answers in one episode. Of course, there are still a lot more questions but I was excited to see more on Bennett. And I was sure surprised to see Hiro's dad! Okay, I'm done. Have a great day and leave a comment or subscribe-or both!

Monday, February 26, 2007

My First Unfroggetable


The Unfroggetable stamp set is so popular! I keep seeing adorable samples on SCS and in swaps. So I just had to have it. I was so excited as I was mounting this set. It really is cute. So then I was ready to stamp something amazing with it. Except I suddenly had no idea what to do. I wasn't sure which stamps to use, what colors, etc. Aahh! I hate when this happens. Every once in a while there is a stamp set that I just HAVE to have and then when I get it I can't seem to make anything cute with it.

So I went to SCS and checked out the samples for this stamp set. Now, remember, I said that everything I'd seen was cute. Well, here I was, looking for something to use as a jumping off point and nothing was looking good to me. I attempted to just start stamping and see what happened. It wasn't pretty.

Finally, I got out my Sweet Shop Ribbon Originals and picked the widest one as a place to start. I pulled the colors from the stripes in the ribbon and got started. While I had been attempting something earlier I had tried using my new Watercolor Crayons to color the frog and I hadn't really liked the result. (I'm not very accomplished at water coloring). So for this attempt I thought I'd go with markers. I always like how markers look. I used Certainly Celery and Garden Green to color the jumping froggy. On my Almost Amethyst card base, I stamped the dragonfly repeatedly in the same color ink. I also stamped the sentiment in Basic Black. I adhered the ribbon to the card and layered the frog on So Saffron and Rose Red. I also used my new Ticket Corner Punch on the white and saffron pieces and added silver brads to the corners of the Rose Red layer. The focal image is on dimensionals.

So there you have it. My first Unfroggetable card. I hope that I can come up with more cute things in the next few days.

I enjoyed hours and hours of Academy Awards yesterday. I was pleased that Jennifer Hudson won. I loved that she acknowledged God in her life. She said, "Look what God can do". So many of the winners spoke of having a dream and sticking to it. I believe that you can do all things, through God, who strengthens each of us. God bless you as you go out there and make your dreams come true.

Saturday, February 24, 2007

Birthday Accoutrment


Still playing with my new Office Accoutrements stamp set. The big flower is so pretty. I stamped it here in Cool Caribbean with the small flower in So Saffron. The card base is Sahara Sand and the {memo} part of the card is stamped in Sahara Sand. I used two pieces of the coordinating patterned paper and attached a file tab that I punched and stamped from Cool Caribbean. Just your standard office stapler was used to attached the tab to the {memo} piece.

I'm having fun with this one and I hope I'll have time today to stamp some more with my new sets. But it is a busy Saturday with basketball games and errands so we'll see.

I just watched this week's episodes of Grey's Anatomy and Lost last night. Wow! Grey's was awesome! Very emotional and Lost was interesting. We got an answer or two to burning questions, but there are always more to be answered. I'll be watching the Academy Awards on Sunday. I love to see all the stars in their pretty dresses and see if my favorite movies will win anything. But this year, I haven't seen a lot of the movies up for the big awards. I'll still enjoy though. Have a great weekend and keep checking back to see what I'm up to.

Friday, February 23, 2007

Accoutrement Appeal


I am so excited to have my spring mini pre-order. I love this Office Accoutrement set and the coordinating designer paper. I couldn't wait to get my new rubbah and start stamping. As soon as I had my set mounted I started rifling through the designer paper for inspiration. Annoyingly, I was coming up short on the inspiration. So I sat there and looked at the paper and looked at the stamps and looked at my ink pads. I kept waiting for something to "speak to me". It wasn't happening. So I decided to just pull out some coordinating cardstock and start stamping. The main item that I actually wanted to use was the file tab punch. Ooh, and I found this mini clipboard in my stash of stuff I bought at the last scrapbook expo I went to back in October. I thought that would be the perfect embellishment.
The card you see is what I ended up with after starting without a plan. The card base is Apricot Appeal and stamped in the same color. The clipboard is covered in the designer paper and stamped in Taken With Teal. For the file tab, I ended up cutting it in half so I'd have only half the thickness. I used my 3/4" circle punch to cut a circle around a flower on another piece of the designer paper for the center of my main flower. I also sponged around the card and clipboard in Taken With Teal. All in all, I think I like this card. Let me know what you think.

Tomorrow I'll show you a scrapbook page that I made featuring this set and paper. I even journaled on it a little bit. Check back then and see what you think!

Thursday, February 22, 2007

Love Me Some More


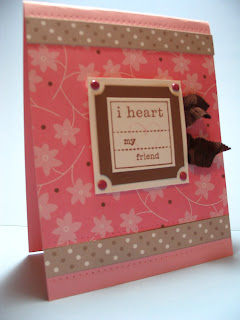
I'm really going to miss this Love Me Designer Paper and the stamps from the Winter Mini Catalog. And look...I even used another piece of the flirty ribbon. I started with a Pretty in Pink base and layered on the Love Me papers. I stamped the I heart image on white in Close to Cocoa adding "my friend" from the Everyday Flexible Phrases. I trimmed and layered that on Close to Cocoa and used my new ticket corner punch on that layer. Then I added one more layer of white with Rose Red brads. I cut two small pieces of the brown flirty ribbon and stuck them down, at angles. The focal image is on dimensionals. I sure have been using those a lot lately. I like the lift they give and the room it leaves underneath for bulky items. Last, but not least, I added a few rows of paper piercing. That must be my favorite detail of all these days.

Yesterday I got my pre-ordered items from the Spring Mini Catalog so I will have a sample from that tomorrow. I also got Unfrogettable in my order. I love everything I see with that one. I can't wait to play with that cute frog prince! So that's what's coming up. Go ahead and subscribe to the newsletter so that you don't miss a thing! And don't be shy...leave a comment. It makes my day!

Wednesday, February 21, 2007

I'm Hopping on the Cuttlebug Bandwagon


Yesterday I was convinced (i.e. peer pressure) *grin* that I should try the Cuttlebug products. I do not have the machine but I have a Sizzix. So I went to Michael's and bought two of the embossing folders: D'vine Swirls and Happy Birthday. It took some doing to get the machine loaded properly to make the impression. It didn't get quite as deep as I would like, but I'll try again.

So here is my first attempt using the swirls background. I used Blush Blossom cardstock for the embossing and layered that onto a Certainly Celery base. The sentiment is from Sincere Salutations and the scalloped rectangle is from Label Classics. Both of those were stamped in Regal Rose. The flower is from Seeing Spots and is stamped in Blush Blossom with a celery brad in the middle. I finally used my first piece of flirty ribbon on this card. Yes, I'm guilty of hoarding. I also used white grosgrain. The focal image is, of course, up on dimensionals.

Here is the "sister" card to the one above. I had stamped two of the sentiment pieces and was actually planning on using a piece embossed with the other cuttlebug folder, but the impression wasn't really deep enough to see so I did something different. I used a piece of the Love Me Designer Paper and stamped Seeing Spots in coordinating ink on the card base. Here I used a piece of Ivory Narrow Organdy. I'm glad I have a few more birthday cards ready. They will be used very soon!

Tomorrow I'm scrapping with friends so I should have a layout or two to show on Friday. Hopefully I'll be inspired enough to get several pages done.

I'm off to get ready for a busy day. I hope you have a good one!

Tuesday, February 20, 2007

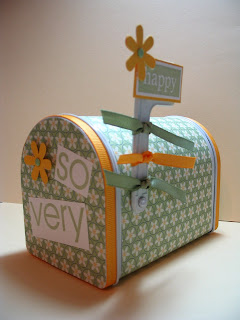
So Very Happy Mailbox


Sell-A-Bration is coming to an end. Only 8 days left. So Very is one of my favorite of the SAB sets. I still have a couple of the cute $1 mailboxes from Target so that's what I was inspired to work on this morning. Also, I have to have a birthday gift for a friend I'm seeing this afternoon and I wanted to package the gift inside the box. I pulled out the Sarah Designer Paper to play. After covering the mailbox I stamped So Very and happy in Certainly Celery on white. I punched flowers from Summer Sun cardstock and put celery brads through them. The yellow is grosgrain ribbon is retired SU! and the green is the current Spring Moss grosgrain. I added the happy to a summer sun layer and attached to the flag with stampin' dimensionals. These really are quick and easy to decorate. I hope my friend likes it.

My dear friend and upline, Beckie sent me some of those chipboard coasters that everyone is using these days. Yesterday I made a little picture frame book. I guess that's what you could call it. Anyway, I covered the coasters with Spring Flowers Designed Paper and added some stamped embellishments. The one on the right is a stamp of the Los Angeles Temple. It is stamped with StazOn onto watercolor paper. I watercolored the image with re-inkers and aqua painters. The scripture on the left is a stamp from God's Way which was featured in last year's spring mini catalog. I added some vintage brads too. I tied the two coasters together with taupe grosgrain ribbon.

The Temple Coaster book will be donated to a Women's Conference that my Church is doing this weekend. Items are being donated and raffled. I hope that whoever gets this will like it as much as I do. In fact, I think I'm going to have to make one for myself!

Have a great Tuesday. I will. My kids are back at school and I get to stamp until it's time to bring the gift to my friend. Yeah!

Monday, February 19, 2007

Scrapbooking Anxiety

This layout is what inspired yesterday's card. These photos are from my youngest son's 7th birthday which was over a year ago. I am so far behind in my scrapbooking it's not even funny! Why don't I scrap more often? Let's not go there for now.

Matt's Great Grandma has her birthday just 3 days before his. So they usually celebrate together. You see "Nanny" in the cake pics with Matt. She turned 79 that year.

Now, onto the scrapbook page. The base is Brocade Blue and the Patterned Paper is Treehouse Designer Paper from SU! The only stamped image is the same as yesterday's post so

see that for the details. I layered photos on More Mustard and the stamped image on Bravo Burgundy. For the title {7} I used chipboard pieces and covered them with coordinating cardstock. I sanded the edges a bit and then sponged the edges with Close to Cocoa. I haven't journaled the pages yet. That is the most challenging part of scrapping for me. I love to read other people's journaling in the magazines and especially on my friend, Beckie's layouts. I have a hard time moving past just stating the facts of the photo or event. I want my journaling to reflect my feelings and my personality. So maybe that's one of the reasons that I don't scrapbook more often.

Another reason is probably the intimidation I feel from being so far behind. I have always scrapbooked chronologically so the months just keep adding up without me getting the photos to the scrapbook. Although this past year I did make 3 theme albums. So that did alleviate some of the anxiety. Scrapbooking should not bring on anxiety. Maybe if I just get started, things will move along smoothly. I guess I'll never know if I don't start!

Sunday, February 18, 2007

Buckaroo Birthday


Here is my first sampling of Buckaroo Blue In Color paper. It coordinates so well with the Treehouse Designer Paper. The focal image is matted onto Always Artichoke. The cupcake image is from Treat Yourself. I used the masking technique to have the frosting look like it is coming over the edge of the cupcake paper cup. I colored the image in with markers and drew confetti onto the frosting as well as added striped onto the candle. The sentiment is from It's Your Birthday. The Buckaroo base is stamped repeatedly with Background Basics. The final touch is the paper piercing around the focal image. I love the way this turned out. It's great for a masculine birthday. Not too froo-froo. And no ribbon or girly embellishments. I had my mustard ribbon out and kept thinking about adding it to the card, but in the end I'm glad that I left it simple.

Have a wonderful Sunday. We're off to Church. Oh, and the girls lost their basketball game yesterday but it was a closer game than any before and Beth made her first basket of the season! Yay Beth!

Saturday, February 17, 2007

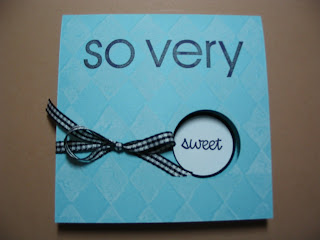
Sweet Caribbean Donut


Do you know about Stampin' Up!s In Color line? I've finally opened my In Color assorted pack of cardstock. The colors are so pretty. Of course, as I was trying to decide which of them to use first I realized that I hadn't bought any of the ink pads for these colors. Hmmm, more of a challenge!

I started with my instant favorite: Cool Caribbean. This card is 4 1/4" square. On the front of the card I stamped the Print Pattern background in White Craft Ink and set that aside to dry for a minute. In the meantime I stamped "sweet" in Basic Black from the "So Very" Sell-A-Bration set on white cardstock and used my 1 1/4" circle punch to cut it out. I punched a 1 3/8" circle from Basic Black Cardstock to layer. Then I picked up my 1 3/8" circle punch again and punched a circle in the front of my Cool Caribbean card. I adhered my punched and layered sweet circle underneath to show through. I stamped "So Very" in Basic Black across the top of the card front and tied a 13" length of Black Gingham Ribbon though the hole I punched and around the edge of the card. No, wasn't that easy?

I used this card as the make-n-take at my workshop the other night. It was easy for beginners as well as more advanced stampers. The refreshing "donut" design kept the card from being too boring. Not to mention the awesome Cool Caribbean color.

So I have ordered the ink pad for the Caribbean color and I'm looking forward to playing with this color more. I have a feeling that I'm going to love each In Color as I get them out to play. Tomorrow I will share the card I made with In Color: Buckaroo Blue.

Have a happy Saturday. The weather is nice here this weekend and my girls are playing parks and rec basketball. Wish us luck...we haven't won a game yet. Maybe today will be the day!

Friday, February 16, 2007

Check it out!

My new blogger friend, Wanda, has posted a card I sent to her on her blog called My Creative Corner . Go look at her blog. It's very nice and she has beautiful projects.

Thanks Wanda!!

Be Happy Birthday


I have realized that I don't make enough birthday cards. Every time a birthday sneaks up on me, and they always do, I have to go start from scratch to make a birthday card. Well, this time was no exception. I needed a birthday card for a fellow blogger. I have had the Word Search Background for about 6 months without using it, so I decided to give it an inkin' love. The base of the card is Tempting Turquoise and stamped with Fontastic Background in the same color. The Word search is also stamped in turquoise. I stamped the flower from Be Happy in Only Orange and cut it out, then layered it on a piece of Only Orange. The tag sticking out from behind the flower is stamped on white in gable green. You could put the name of the birthday girl or boy there. For the flower center I punched gable green with my 1/2" circle punch and put the pieced together with a turquoise brad. I popped the flower up with dimensionals. I added a piece of white grosgrain ribbon. I would have liked one of the other colors from the card, but alas, I did not own any of those colors. Last but not least I circled the words "happy birthday" in orange marker on the word search piece. Ooh...I also paper pierced the green layer. I loved this card as soon as I finished it. The colors are nice and bright and happy!

Now I need to get on the ball and make a dozen or so birthday cards so I have them on hand when the pesky birthdays sneak up on me. So my challenge of the day is for you to make a birthday card too! If you have a blog or a photo gallery post the info in the comment section so that I can see what you made. I love to see other people's artwork. And I need the ideas for birthdays.

Have a great Friday!

Thursday, February 15, 2007

Natural Beauty


This card is for my workshop tonight. The background is Bashful Blue. I wheeled the Rough Texture Wheel in both directions in the same color. The band at the bottom is Always Artichoke stamped with Itty Bitty Backgrounds in the same color. On a piece of Vanilla I stamped the large flower from Natural Beauty with Basic Black. I colored in with Stampin' Pastels and a Blender Pen. I hadn't used my pastels in at least a year. There was a thick layer of dust on the lid! And I realized that I still have the pastels with all the old colors. I really need to update my chalks and then use them more often. After coloring I stamped more Itty Bitty Backgrounds in Barely Banana around the edges and did a little direct to paper on the edges with the Banana pad. Before I layered the focal image I used my 1/2" circle to make the ticket corners. I've been wanting to order the punch for that but haven't gotten around to it yet. So I just put the paper in a little bit and punched. I like how that leaves a perfect little space for a brad. I used the Barely Banana brads found in the Soft Subtle pack. The image is layered on Not Quite Navy. That is one color I almost never use. So I wanted to give it a try. I consulted my color coach to figure out what other colors I was going to use. To finish off the card I added a piece of Twill Tape and popped the focal image up with stampin' dimensionals.
Make sure you subscribe to my blog so that you get emails whenever I post something new. I have some cute things coming up!! And leave a comment if you like what you see. It will make my day. Thanks for looking.

Tuesday, February 13, 2007

I'm Still Wild About You!


Here's my offering for the day. I have made 8 of these for a swap tonight. I love the way this turned out. Not to toot my own horn...but...okay, maybe I am tooting my own horn! I used a color combo I had never used before that I saw while checking out the gallery at SCS. The card base is Certainly Celery with a band of More Mustard and the large scalloped circle is Elegant Eggplant. And the adorable elephant is stamped in Almost Amethyst onto Whisper White. The large circle is scalloped by using the slit punch again. I cut a "doughnut" with my Coluzzle and the punched around the outside by inserting my punch through the center of the "doughnut". I also used the Word Window Punch for the sentiment. The argyle stamp on the mustard band is from Background Sampler. I also used markers to color the flower image.

Thursday night I'm have a mystery hostess workshop at my house so if you are in the area, come on by! There will be a gift for everyone and a fun make-n-take. I also need some more workshops for my Boot Camp Challenge...there will be a gift for anyone booking that night.

I'm off to get ready for my group meeting tonight and work on Valentine's projects. Have a great day.

Sunday, February 11, 2007

Boot Camp Challenge


I am doing a Stamper's Boot Camp. It is six weeks of challenges to help build my Stampin' Up! business and stretch me creatively. So the stamping challenge for Week 1 was to find a card in the current catalog to copy exactly. Then make another using the same layout but changing the colors and stamps. So I chose this card from page 139. I love the stamp set Winged Things and I was happy to get it out since I haven't played with this one in a while. This card is very simple, but not plain. The idea of copying a card from the catalog is to show customers that the ideas in the book are easily re-creatable.

The second part of the challenge was more fun because I could pick and stamp set that inspires me. I chose Wild about You because Beckie had just done such a cute card with that set. See her card here. With the color combo I had already chosen I thought that the lion would look the best. So here is my alternate catalog card. Enjoy. Now try your own copy and change challenge!


Saturday, February 10, 2007

Heartfelt Card Wallet


I know I'm a day late posting this, but I just got busy yesterday and couldn't get to the computer. So here is the other demo from my workshop on Thursday. This is a card wallet. I was first introduced to these adorable creations on Debbie Olson's Blog entry of 1/24/07. On Debbie's posting there are also links to another site with directions. But really it's quite easy to make. I used Heartfelt Thanks, So Very, Elegant Greetings, and the Watercolor Joy Wheel. Paper colors are Certainly Celery, Regal Rose, So Saffron, Whisper White. Inks are Regal Rose, Rose Red, So Saffron and Basic Black. The wheel ink is So Saffron. For the square on the belly band I used the two largest square punches. And for the scalloped edge I used the slit punch.

On the inside of the wallet are envelopes that have been cut in half after sealing to serve as pockets for notes. I used vellum envelopes and punched a half circle on the front layer with my large circle punch. The notes have hodgepodge hardward attched to them and I added bits of light pink grosgrain ribbon. On top of each envelope I cut out a flower from Heartfelt Thanks and punched a word from So Very with the Word Window Punch. I hope you like my take on the Card Wallet. Try one for yourself!

I'm thinking about a tutorial for you for next week. I'm a wee bit intimidated about typing up instructions. I usually have to show someone to make myself clear. I've got plenty of stamping to do in the coming days. I have a group meeting, a swap, a workshop and a stamp camp to prepare for. So I'll have several projects to post. Keep checking back to see what's new.

Have a great weekend. It's a 3-day weekend for my kids so I get to sleep in on Monday! WooHoo!

Thursday, February 8, 2007

Sweet & Simple Scrapbook Page

Here is my first scrapbook page to post for you. I demoed this at a workshop today. I cased the layout from the SU! Demo Website but there is also a similar layout on page 113 of the current SU! Idea Book & Catalog. I started with a 12 x 12 piece of Chocolate Chip Cardstock. Then layered a large piece of So Saffron on that. On the So Saffron piece, I stamped with Petal Pushers in So Saffron Classic Ink. Then I pierced holes around all the edges and drew in Chocolate Chip lines to mimic stitching. I mounted my 5 x 7 photo on Really Rust. I stamped "Cousins" in Chocolate Chip on a piece of Naturals Ivory. Below that I layered a piece of Bashful Blue. Next I stamped several of the flowers from Petal Pushers on Naturals Ivory and cut them out. I used Really Rust, So Saffron and Bashful Blue inks to coordinate. I layered the cut flowers around the title and put the Rust Sunflower up on a Dimensional. I also added a clear button with Spring Flowers Designer Paper behind it. The button is tied with a piece of Linen Thread. My favorite part is the large flower embellishment at the top of the page. The flower is a Chipboard piece that I adhered a piece of the Designer Paper to and then sanded the edges. The small flower on top of that is also a chipboard piece but I sponged it with So Saffron. The chipboard pieces were then adhered to the page.
So my workshop was fun. My hostess, Karen, was fantastic and a lot of people came.
Tomorrow I will post the other project I showed.
Today my 8 and 11 year old are making me crazy with their bickering. They just can't seem to be nice to each other or stay out of each other's business. They also love to tattle. This behavior is so frustrating and I'm all out of ideas to curb it. I know I used to have ideas when my two older kids acted like this. I think my brain cells are seeping into my pillow when I sleep. Thank goodness for a Driver License to remind me of my name and age! haha So anyway, I'm open to suggestions to help me keep my kids in line. I guess the main thing missing is respect for one another. hmmm, I'll have to think on this. Wish me luck...I'll probably come up with something brilliant but by the time I'm ready to implement it I'll have forgotten what it was.

Wednesday, February 7, 2007

Very Punny Magnets


It's been a few years since I made some of these marble magnets. They are really easy and fun to make. The cute little animals in the Very Punny set are perfect for this. I just omitted the sayings at the bottom of the stamp. I started with a sheet of Shimmery White Cardstock. I was able to stamp about 28 times on one sheet. I then colored each image with SU! markers. Now, in the past I had problems with the marker running once I added the marble with glue. So I decided to try a different kind of glue this time. I used Glass and Bead Glue. It worked like a charm. In fact I even used the same glue to attach the magnets to the back of the marble.
Once the glue was dry I used scissors to cut the excess paper away from the marble. The most difficult part of this whole project was finding the flat marbles. I used to get them at WalMart but I checked three different stores and Michael's with no luck. I finally scored at JoAnn's and was happy to see that the brand they carry is actually a better quality that the one I used to get at the other place.
So now are you wondering why I made almost 30 of these magnets? Well, I have four kids and they bring home so much art from school.....no, just kidding. I'm having a Mystery Hostess Workshop next week and have promised a free gift to all who attend. These will be packaged in cello bags with crinkle shred, a tag and ribbon. I really don't expect that many people to come, but I invited over 30 and I'd hate to come up short. I'm sure I'll be able to find uses for any left overs.
Have a stampingly great day! I know I will!

Tuesday, February 6, 2007

2-fer Tuesday!

Yes, I meant to say 2-fer! Today you get a card and a recipe. This card is from the SAB set: Happy Harmony. I borrowed it from my friend and DL Christine. Thanks, Christine! For this one I started with a Certainly Celery card base. I like this paisley designer paper so I used a small piece for a partial background. On Very Vanilla I stamped the floral image, having inked the stamp with markers in Barely Banana and Certainly Celery. I added a little sponging around the flowers and around the edges in Barely Banana as well. I then stamped one of the beautiful sentiments in Close to Cocoa. I layered the focal image onto Bashful Blue and before attaching to the card, I added light blue narrow organdy around the card. At that point, I thought the card still needed a little something so I got out my paper piercing tools and added a row of piercing at the top and bottom of the designer paper and again at the bottom of the card. Then it looked finished to me. This stamp set is so pretty. I can't wait to try some more layouts.

Now for the recipe. We had a fun Super Bowl Party on Sunday and made way too much food! This is a recipe that I hear on the radio and had never tried before. It turned out delicious, by the way. I hope that you enjoyed the commercials on the Super Bowl as much as I did. That's really the only reason that I like to watch. I think my favorite is the Rock, Paper, Scissors one for Bud Light. Of course, Bud Light had several great commercials throughout the game. Anyway, here is the recipe:

Bacon Wrapped 'Lil Smokies
1 package of 'Lil Smokies
1 pound bacon
brown sugar

Cut each piece of bacon into thirds. Wrap each 'lil smokie in a piece of bacon and secure with a toothpick. After you have all the smokies arranged on a baking sheet, sprinkle with brown sugar. Bake at 400 degrees for 40 minutes.

Yum!

Friday, February 2, 2007

Brayered Delight


I totally CASE'd this card from dawnsstampingthoughts.typepad.com/. I had never tried the resist / brayer technique before. First I took a piece of glossy white cardstock and stamped with StazOn Black. Then I colored in with SU!'s Metallic Pencils. Then I loaded my rubber brayer with Close to Cocoa ink and brayered the glossy cardstock over and over until it was the color I liked. I then took a tissue and wiped gently where I had colored. The pencils had resisted the ink. I felt like I needed to re-color the flowers once I had finished wiping. I layered with Chocolate Chip cardstock and drew dots with my white gel pen. The card base is Creamy Caramel stamped with French Script in Close to Cocoa.
I've had this card laying on my desk for a few days now and I love it every time I look at it. It feels like a warm, worn blanket. And I have needed all the warmth I can get lately. The freezing temps here are getting to me, I guess.
Today we're cooking for the Super Bowl. We'll be having a few friends over. So this weekend I will share one of our favorite recipes. Maybe for my husband's famous Artichoke Dip. Yum! So have a great weekend and enjoy all the great commercials on during the Super Bowl...that's my favorite part!